Fellow EVers,
Join me in tracking your EV at http://evclub.org.
This is a handy sight a friend of mine put together to track your EV miles, fuel saved, money saved, carbon reduction, etc.
You can now follow my EV statistics on right side of this blog.
Check it out!
Saturday, November 17, 2012

Monday, September 3, 2012
Petition Time
There is a petition going to get the federal government to give us converters the same tax incentives that production vehicles are receiving. This would really help justify the cost needed. Please check out the following link and add your signature to the list.
https://petitions.whitehouse.gov/petition/we-should-support-oem-and-aftermarket-plug-vehicles-same-tax-incentives/V8qMBrGN?utm_source=wh.gov&utm_medium=shorturl&utm_campaign=shorturl
https://petitions.whitehouse.gov/petition/we-should-support-oem-and-aftermarket-plug-vehicles-same-tax-incentives/V8qMBrGN?utm_source=wh.gov&utm_medium=shorturl&utm_campaign=shorturl
Monday, August 20, 2012
Back on the road. Take 3, or is it 4 now?
Not much to say other than I drove the EV into work again today. I put everything back together this weekend and made some small modifications to how the batteries were secured to the car in that area (where the gas tank use to be). It was a huge pain to get them out and remove that one cell, so I felt I should changes things a bit. Nobody wants to get in there and take this thing apart, but the day will come again.
I've mounted my CellLogs further from the trunk lid. Hopefully this will keep the heat down and reduce my chances of further electronic glitches from. I'm still thinking this was the case of the failure, but don't have any proof without being there.
I've mounted my CellLogs further from the trunk lid. Hopefully this will keep the heat down and reduce my chances of further electronic glitches from. I'm still thinking this was the case of the failure, but don't have any proof without being there.
Tuesday, August 7, 2012
Battery Failure
After about a month back on the road I lost a cell. I drove to work, put it on the charger and it failed to charge. After further investigation I saw the problem.

I had lost a cell. It had expanded upwards! Here are some more pictures after I had removed it from the car.


I had lost a cell. It had expanded upwards! Here are some more pictures after I had removed it from the car.


This is how the battery was. I didn't pull the cells out and I'm not able to. They are very tight! There must be a hundred cells in these.

Here is a close up of one of the cells that ripped open. They are paper thin!

Wednesday, June 27, 2012
Battery load testing
I've been using the CellLog8 units for monitoring my high and low voltage for awhile now. I've yet to use the logging feature of the CellLog8S. Sadly I saved some money and only bought one unit that does the logging. I had to run seven seperate tests and the graphs don't match up for a really good comparison but I think the results still show what I wanted to know, "Which cells have had a significant increase in internal resistance".
The tests main goal was to take the cells to 3C (480 amps) and check for cells that are sagging too much.
All cells are connected with busbars except (15-16, 30-31, 37-38, 42-43, 45-46) which are connected with 2/0 cable.
This is the legend for cells 1-8 of each graph.

Cells 1 - 8
Cell 5 appears the be the worst of them. It sagged below 2.0v at 3C

Cells 9 - 16
These cells were fairly spread out from about 2.6v-2.85v. The lowest was 16 so this might be from any voltage sag across the cable.
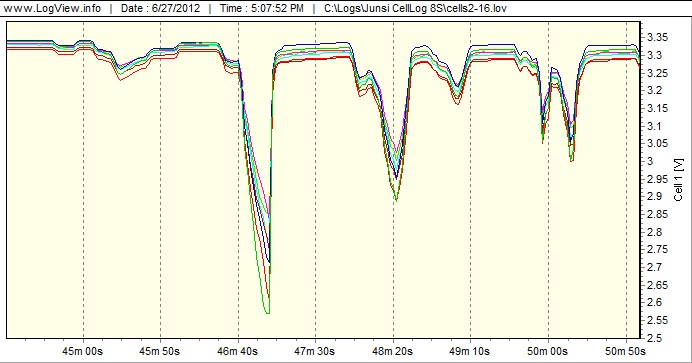
Cells 17-24
This group was mostly 2.8v-2.9v except cell 19 around 2.6v.

Cells 25-32
This group had cells in the range of 2.4v - 3.0v. The two that stand out are cells 30(2.4v) and 32(2.6v). 30-31 seperate the from and rear packs and would be the area to show the most voltage sag so I don't think this cell is as bad as it looks.

Cells 33-40
This group had a wide voltage range as well. Cell 33 was the worst at about 2.5v.

Cells 41-47
Nothing too bad here, worst cell being 47 at 2.8v.

Cells 48-54
By far the best group (these are all newer cells). All cells were around 3.05v-3.1v.

I'm frequently getting low voltage alerts (<2.5v) while driving and was curious how many cells were meeting this criteria. First I'll recheck the torque on the batteries, but assuming thtat is fine, it looks like I can replace the one cell and fix this. My normal driving never reaches 3C range unless I'm really needing to pass somebody. Replacing this one cell should remove the low voltage alerts most of the time. I have an extra cell sitting around that I've tested at 160Ah capacity. I'll replace cell 5 with it and hope the voltage sag on it is closer to the averages seen here.
Sunday, June 17, 2012
Heatsink replaced
I got some time yesterday and installed a new heat sink that I think will be more efficient while driving. I mentioned before the old heat sink below has the fins parallel with the controller, but the air while driving is perpendicular to the fins.
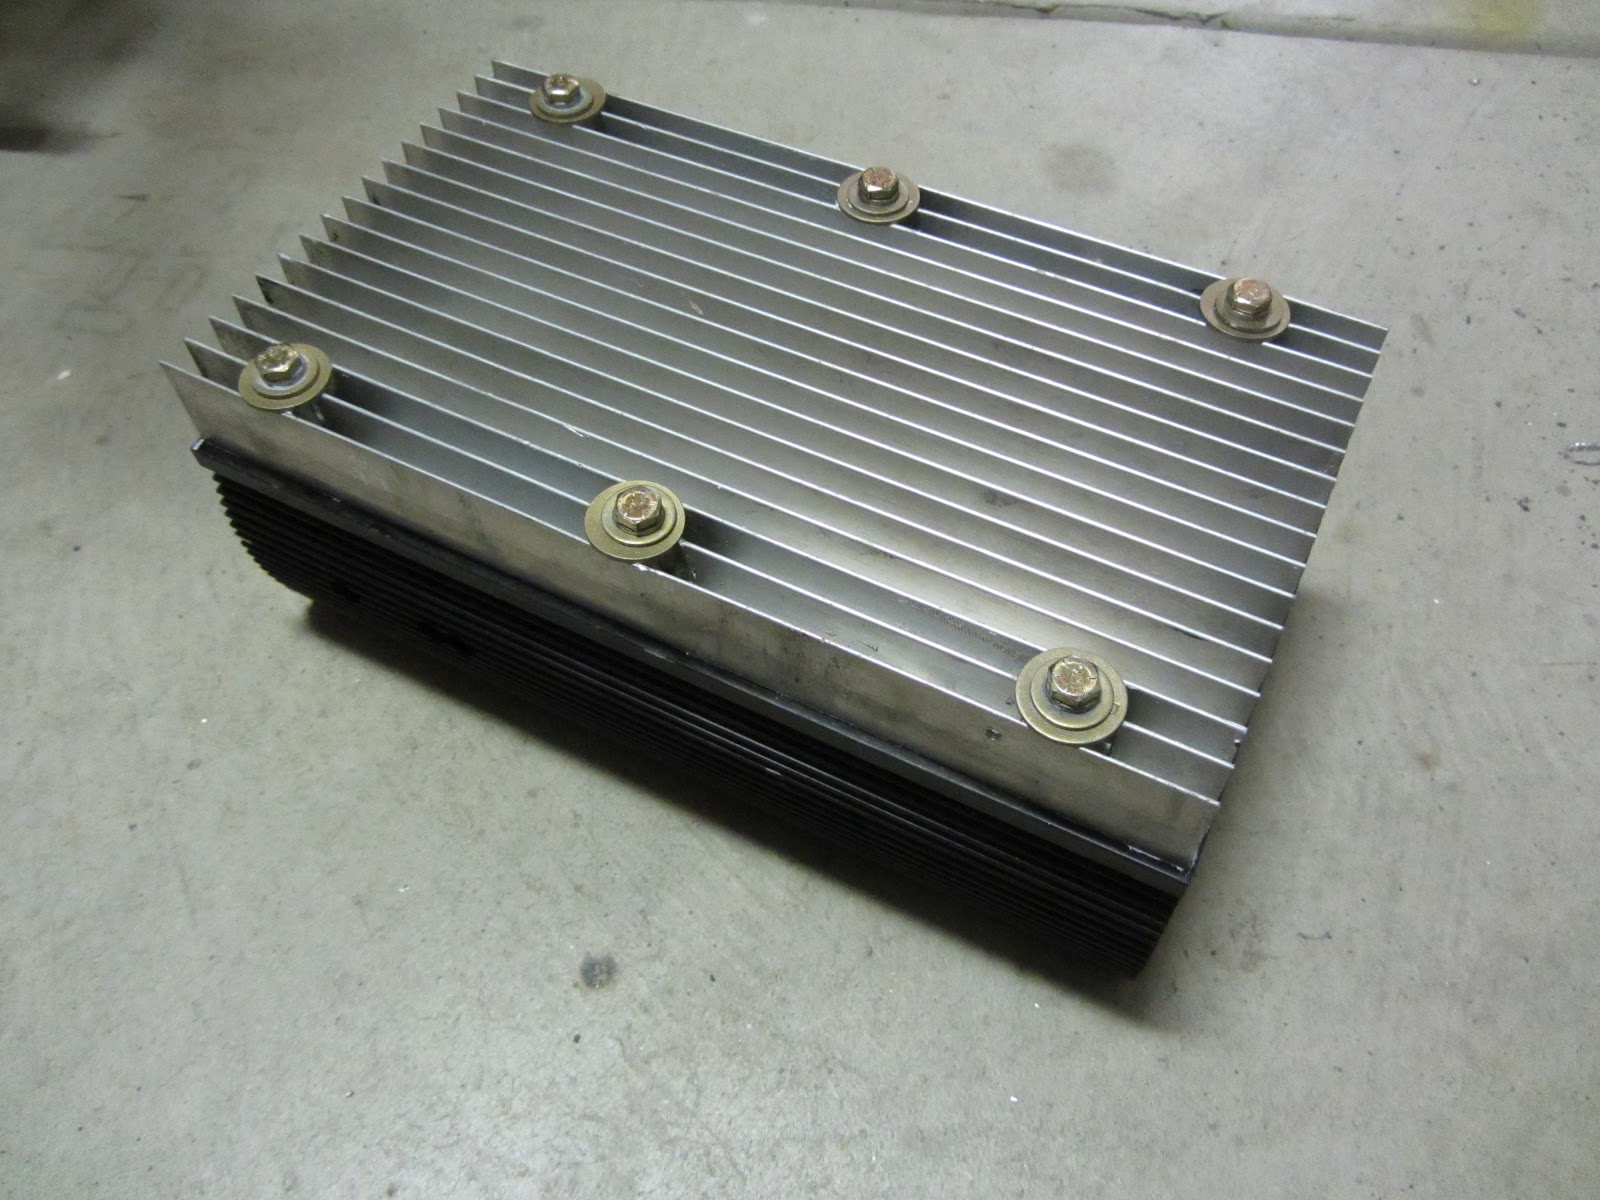
Here is the new heat sink attached to the controller. You can see the mill work done so the bolts are recessed now and touch the thicker base of the heat sink. This allows for more consistent torquing than before and should allow for better heat transfer. Don't forget your thermal compound when installing any heat sink. Thermal compound greatly increases the heat transfer

I wanted a better way to attach my temperature sensor for the controller. I made a little L bracket that attaches to one of the bolts.

Here is another shot with the sensor attached. I'll try to do some temperature comparisons next week, but with the increase in temperature just over the weekend it may be hard to get any reliable results.

Thursday, June 14, 2012
This is cool!
Awhile back when I was still running the ADC 9", I had installed the air conditioner around Fall time or so. Before summer hit, the ADC motor went out. Replacing with a Netgain Warp 9 I soon found out that only the transmission bolt patterns matched. The accessory side did not. The accessory output shaft was larger, the motor diameter, slightly larger. A few little things that made my existing AC setup worthless.
Now that I'm driving to work again, and the heat is coming, I figured it was time to rebuild the AC system. There was quite a bit of machine work needed, so luckily my uncle Duane had some time yesterday. The main pulley was bored out to 7/8" and a new key way made. A thin bushing was made that went on the shaft first. This slid to the furthest inward point on the shaft and allowed us to tighten against that and not allow anything to slowly walk in and rub on the housing. Next, I reinstalled the Netgain RPM sensor and finally the main pulley went back on. A 3/8" bolt, custom washer, and some Loctite then went on to keep everything in place. The mounting brackets base had to be cut and slid outwards about 1/4" to account for the new position of the main pulley.
Here are some pictures of the final system. You can see I reused the auto tension pulley from the original serpentine belt system. I reused the same belt I purchased the first time I did the AC. Luckily it was still the right length even after the positioning of the components shifted a bit.


Now that I'm driving to work again, and the heat is coming, I figured it was time to rebuild the AC system. There was quite a bit of machine work needed, so luckily my uncle Duane had some time yesterday. The main pulley was bored out to 7/8" and a new key way made. A thin bushing was made that went on the shaft first. This slid to the furthest inward point on the shaft and allowed us to tighten against that and not allow anything to slowly walk in and rub on the housing. Next, I reinstalled the Netgain RPM sensor and finally the main pulley went back on. A 3/8" bolt, custom washer, and some Loctite then went on to keep everything in place. The mounting brackets base had to be cut and slid outwards about 1/4" to account for the new position of the main pulley.
Here are some pictures of the final system. You can see I reused the auto tension pulley from the original serpentine belt system. I reused the same belt I purchased the first time I did the AC. Luckily it was still the right length even after the positioning of the components shifted a bit.


I took it out for a drive today after I finished. It was about 92F outside, so not too bad but hot enough when the top is up to make you start sweating pretty quick. I turned on the AC and instantly the temperature dropped to a very comfortable level and remained there for a quick 10 mile test. Too cool! No more hot days driving home.
The heat from the condenser now passes right by my motor controller and that heat sink. I'm now noticing the temperature of my motor controlling running much hotter. I'll be replacing that heat sink next with one where fins run parallel with the wind, compared to perpendicular as they do now. More on that later.
Monday, June 11, 2012
Back to work
I drove the S2K to work all last week and things are looking pretty good. I'm using 100Ah to get from home to work and 65Ah to get back home. This gives a pretty idea of what a 2,000 ft elevation climb will do to your range. Since my weakest cell is still delivering nearly 140Ah, I should be in good shape for quite some time.
Air Conditioning:
The weather is going to start heating up. Later this week I have plans to meet up with my uncle and get some machine work done. Afterwards, I can rebuild the brackets to mount the compressor and I should have a comfortable commute home in the afternoon. I'll post some pictures of the AC system when completed.
Air Conditioning:
The weather is going to start heating up. Later this week I have plans to meet up with my uncle and get some machine work done. Afterwards, I can rebuild the brackets to mount the compressor and I should have a comfortable commute home in the afternoon. I'll post some pictures of the AC system when completed.
Sunday, June 3, 2012
My worst cell
I was curious to see how much my cells have degraded so I took the car out for a test drive. I forgot how much I missed this car until I dropped the top and drove through the hills. What a blast!
I drove 65 miles and brought it home using 137 Ah. At this point my check engine light was coming up with only about 1C draw so I new at least one cell was getting low. I saw that my voltages were fairly well scattered around which was expected considering how scattered the self discharge seems to be.
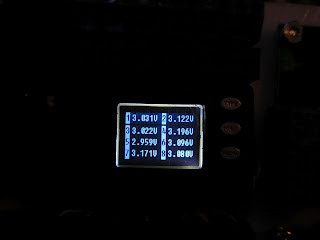
Below are the photos of each cells voltage starting from the back of the car and working forward. There is one cell at 2.7v. This cell is basically dead and my worst cell. I'll probably yank or replace at least it. I have two more cells at 2.9 which means there is maybe another 5Ah in them tops. Most of the remainder of the pack is around 3.1. I'm guessing there is at most 10Ah in these cells. On the last two pictures you'll see sequentially 10 cells which are all 3.25v. These are the additional cells I added about 1.5 years go which have almost no miles on them compared to the others. They are still happy and have at least 20-25Ah left in them I'm guessing.
So this means that my worst cell is still giving me just over 85% capacity after four years. If I hadn't over charged some cells slightly, and over discharged multiple times, and never went over the 3C rating, I would be a bit upset. Considering the abuse I'm guessing this is right on par with what's to be expected.



So now I'm debating what to do. Ultimately I'm thinking I'd like to go with a much higher pack, say 350v using 100Ah CALB cells. These cells are now rated at 4-5C with 10 second bursts of 8C! This would require multiple changes. First and obviously the pack needs to be completely replaced which isn't cheap. Second the motor controller would need to be replaced with something like the Netgain or Soliton1 which allows high input voltage but you can regulate the motor side voltage to keep it safe. This also equates to even lower cell side amperage draws which should be easier on the cells. I'd also need to replace the charger. No hard feeling here though. The Thundersky charger is twice the size of say the Manzanita Micro charger for the same output (did I mention is weighs twice as much too?).
My other thought is to slowly replace the TS 160Ah cells as they wear out with CALB 180Ah cells. Physically they are identical so no mods would be required. These cells are also 4-5C rated so they can handle the amps my modified Curtis is demanding. I've got some thinking to do.
Either way, before I get back on the road any time soon, the AC needs to be redone. I'll need to engineer the mounting bracket (again) and machine some parts for the pulley. It's a shame it wasn't a direct bolt on replacement from the ADC 9".
It's suppose to cool off next week, so despite no AC, I think I'll drive it to work and see how the batteries hold up before investing any further time.
I drove 65 miles and brought it home using 137 Ah. At this point my check engine light was coming up with only about 1C draw so I new at least one cell was getting low. I saw that my voltages were fairly well scattered around which was expected considering how scattered the self discharge seems to be.
Below are the photos of each cells voltage starting from the back of the car and working forward. There is one cell at 2.7v. This cell is basically dead and my worst cell. I'll probably yank or replace at least it. I have two more cells at 2.9 which means there is maybe another 5Ah in them tops. Most of the remainder of the pack is around 3.1. I'm guessing there is at most 10Ah in these cells. On the last two pictures you'll see sequentially 10 cells which are all 3.25v. These are the additional cells I added about 1.5 years go which have almost no miles on them compared to the others. They are still happy and have at least 20-25Ah left in them I'm guessing.
So this means that my worst cell is still giving me just over 85% capacity after four years. If I hadn't over charged some cells slightly, and over discharged multiple times, and never went over the 3C rating, I would be a bit upset. Considering the abuse I'm guessing this is right on par with what's to be expected.


So now I'm debating what to do. Ultimately I'm thinking I'd like to go with a much higher pack, say 350v using 100Ah CALB cells. These cells are now rated at 4-5C with 10 second bursts of 8C! This would require multiple changes. First and obviously the pack needs to be completely replaced which isn't cheap. Second the motor controller would need to be replaced with something like the Netgain or Soliton1 which allows high input voltage but you can regulate the motor side voltage to keep it safe. This also equates to even lower cell side amperage draws which should be easier on the cells. I'd also need to replace the charger. No hard feeling here though. The Thundersky charger is twice the size of say the Manzanita Micro charger for the same output (did I mention is weighs twice as much too?).
My other thought is to slowly replace the TS 160Ah cells as they wear out with CALB 180Ah cells. Physically they are identical so no mods would be required. These cells are also 4-5C rated so they can handle the amps my modified Curtis is demanding. I've got some thinking to do.
Either way, before I get back on the road any time soon, the AC needs to be redone. I'll need to engineer the mounting bracket (again) and machine some parts for the pulley. It's a shame it wasn't a direct bolt on replacement from the ADC 9".
It's suppose to cool off next week, so despite no AC, I think I'll drive it to work and see how the batteries hold up before investing any further time.
Tuesday, May 29, 2012
Too much voltage, a new motor, and self discharge.
Sorry for the long delay in updates. I ran into just a couple months after starting to drive again (this was more than a year ago now). The ADC just couldn't handle the extra voltage and fried. The armature had a nice black burn on it. I debated getting it repaired but figured this motor was never intended for this much voltage. I purchased the gen 2 Warp9 which is suppose to handle a lot more voltage. It was also suppose to be a direct bolt in compared to the ADC 9. Some of this is true as the transmission mounted up perfectly. Unfortunately the motor itself is slightly longer and wider. I had to redo my motor mounts and the battery rack above the motor to get it to fit. The AC, of course, then also did not mount back up and I still haven't finished redoing it.
While driving though I did figure out the cutting out issue I'd been seeing. It was not the motor but the controller itself. It was switching frequencies and making a terrible jerking affect. My friend has now modifed the controller to remove this feature.
The car was done for quite awhile and then not driven at all the last year which led to another interesting discovery. Remember that I dropped all balancing boards to experiment to see the real need for this. Every 3 months or so I'd go out and plug the car back in to charge. Now, after a year I was getting ready to take it on a long drive and notice one cell was very low 3.1v resting. I charged the pack but only to replace about 20Ah in the pack. I then charged the one cell to find it took an additional 60Ah! My first thought was this cell is bad but it turns out most of pack was VERY unbalanced just from the self discharge. Each cell was different taking another 20-60Ah compared, I guess, to some of the better cells that didn't self discharge so bad. I'm in the process of replacing the balancers and getting the pack balanced again. I then plan to do another capacity test on this pack and see what shape it's in. I'm hoping to start driving it to work again when weather permits.
While driving though I did figure out the cutting out issue I'd been seeing. It was not the motor but the controller itself. It was switching frequencies and making a terrible jerking affect. My friend has now modifed the controller to remove this feature.
The car was done for quite awhile and then not driven at all the last year which led to another interesting discovery. Remember that I dropped all balancing boards to experiment to see the real need for this. Every 3 months or so I'd go out and plug the car back in to charge. Now, after a year I was getting ready to take it on a long drive and notice one cell was very low 3.1v resting. I charged the pack but only to replace about 20Ah in the pack. I then charged the one cell to find it took an additional 60Ah! My first thought was this cell is bad but it turns out most of pack was VERY unbalanced just from the self discharge. Each cell was different taking another 20-60Ah compared, I guess, to some of the better cells that didn't self discharge so bad. I'm in the process of replacing the balancers and getting the pack balanced again. I then plan to do another capacity test on this pack and see what shape it's in. I'm hoping to start driving it to work again when weather permits.
Sunday, November 21, 2010
Back on the road
It's been awhile but I have been working on the car as often as possible and I'm finally back on the road.
The original BMS didn't have any wire protection, if for some reason a wire got shorted out and burned up, you'd have to rerun that wire. I added small inline fuses to each cell at the battery. It's a little more cost and time, but something that's worth it in my opinion.
Here is a picture of the completed front end. Six batteries were removed from the original design to all for the AC compressor and pulley assembly. The good news is I finally have AC, but the news is it's winter time and I have to wait awhile to use it. However, part of this was to add the heater and on the cold mornings it really heats up the small cab space of this car quickly.

The motor controller was modified in multiple ways. First the Curtis "whine" was removed and the car is now completely silent, as an electric car should be. The maximum voltage was increased to allow for my fully charged voltage on 54 cells (I charge up to about 184v). Finally the amps was increased from 500 to 750. This made a huge difference in acceleration and overall power. My 0-30 went from (I think it was 7 seconds) down to less than 4 seconds. Overall the total power of the controller went from 72kW to just over 130kW.
I removed that large, and unreliable BMS screen from the dash and replaced it with the E-xpert Pro. This has turned out to be a great little display. On top of showing pack voltage, amps, Ah, and remaining runtime, it has some other extras and is highly configurable. You can customize this meter to your battery, driving needs and how hard you want to push your battery by setting what is considered full, empty, when to raise alarms, etc. So for example I setup mine to alert me when the pack is 30% SOC and to consider 20% SOC empty. This affects how the "fuel" gauge displays its bars. I also turned on a feature that will automatically add the back light as long as >1 amp is going through the shunt. As I drive the back light is on, and 10 seconds or so after stopping it turns off. I also configured the meter to consider the battery full when 184v is reached and the charger is at about 2 amps for at least 1 minute. This then resets the Ah counters and gauge and avoids any calibration errors that might allow the meter to slowly drift over time.

Here is the trunk now. I wouldn't call it finished because things are still a little messy and I'd like to get carpet back in there. Trunk space is still reduce, but I can at least fit something in there now if needed. The little black things on top of the charger are the new Cell Log 8 modules that I'm using to monitor high and low voltage conditions. These are about $13 a piece and will monitor 8 cells each. I build a little circuit board for each to simplify the wiring. They have an internal relay that allows you to provide signalling to the charger, a buzzer, light, etc. They are not isolated, however, so expect to use an additional relay on each module to isolate it. These modules will turn on when the charger is connected to AC power or the key is on.

Another thing I modified this round was the suspension. I added another 9 cells (over 100 lbs) and with so much additional weight in the rear I knew I couldn't avoid it this time. Online I found the spring rates saw that the rear springs were much stiffer than the front. The front springs were 245 lbs/in while the rear springs were 311 lbs/in. I moved the rear springs to the front of the car and replaced the rear with 10" (original springs are 11" unbound) 400 lbs/in springs. The put the rear exactly back to stock ride height and my front is still 1/4" lower but I think within range for alignment. I still need to take the car back down for an alignment to see if this will do.
It's great finally being back on the road. The gas to drive my truck 70 miles to work each day was really adding up. That and I just missed my car, too much fun to drive. I'll keep you posted on miles. I think around 16-17k miles total at this point.
The original BMS didn't have any wire protection, if for some reason a wire got shorted out and burned up, you'd have to rerun that wire. I added small inline fuses to each cell at the battery. It's a little more cost and time, but something that's worth it in my opinion.
Here is a picture of the completed front end. Six batteries were removed from the original design to all for the AC compressor and pulley assembly. The good news is I finally have AC, but the news is it's winter time and I have to wait awhile to use it. However, part of this was to add the heater and on the cold mornings it really heats up the small cab space of this car quickly.

The motor controller was modified in multiple ways. First the Curtis "whine" was removed and the car is now completely silent, as an electric car should be. The maximum voltage was increased to allow for my fully charged voltage on 54 cells (I charge up to about 184v). Finally the amps was increased from 500 to 750. This made a huge difference in acceleration and overall power. My 0-30 went from (I think it was 7 seconds) down to less than 4 seconds. Overall the total power of the controller went from 72kW to just over 130kW.
I removed that large, and unreliable BMS screen from the dash and replaced it with the E-xpert Pro. This has turned out to be a great little display. On top of showing pack voltage, amps, Ah, and remaining runtime, it has some other extras and is highly configurable. You can customize this meter to your battery, driving needs and how hard you want to push your battery by setting what is considered full, empty, when to raise alarms, etc. So for example I setup mine to alert me when the pack is 30% SOC and to consider 20% SOC empty. This affects how the "fuel" gauge displays its bars. I also turned on a feature that will automatically add the back light as long as >1 amp is going through the shunt. As I drive the back light is on, and 10 seconds or so after stopping it turns off. I also configured the meter to consider the battery full when 184v is reached and the charger is at about 2 amps for at least 1 minute. This then resets the Ah counters and gauge and avoids any calibration errors that might allow the meter to slowly drift over time.

Here is the trunk now. I wouldn't call it finished because things are still a little messy and I'd like to get carpet back in there. Trunk space is still reduce, but I can at least fit something in there now if needed. The little black things on top of the charger are the new Cell Log 8 modules that I'm using to monitor high and low voltage conditions. These are about $13 a piece and will monitor 8 cells each. I build a little circuit board for each to simplify the wiring. They have an internal relay that allows you to provide signalling to the charger, a buzzer, light, etc. They are not isolated, however, so expect to use an additional relay on each module to isolate it. These modules will turn on when the charger is connected to AC power or the key is on.

Another thing I modified this round was the suspension. I added another 9 cells (over 100 lbs) and with so much additional weight in the rear I knew I couldn't avoid it this time. Online I found the spring rates saw that the rear springs were much stiffer than the front. The front springs were 245 lbs/in while the rear springs were 311 lbs/in. I moved the rear springs to the front of the car and replaced the rear with 10" (original springs are 11" unbound) 400 lbs/in springs. The put the rear exactly back to stock ride height and my front is still 1/4" lower but I think within range for alignment. I still need to take the car back down for an alignment to see if this will do.
It's great finally being back on the road. The gas to drive my truck 70 miles to work each day was really adding up. That and I just missed my car, too much fun to drive. I'll keep you posted on miles. I think around 16-17k miles total at this point.
Wednesday, September 8, 2010
Trunk Ventilation
One issue I frequently dealt with was the charger shutting down due to over heating. I would finish work and come out to find a car with less than full charge. Luckily most of the time it had charged enough to still get my home, but I found myself a couple of times sticking around work another hour or more. The temporary solution was to leave the trunk slightly cracked during non winter months and this did the trick.
I plan to ensure adequate ventilation this time and have installed two 120mm fans. They will connect directly to the 240v charger source and run continuously during the charge cycle. The fans are quiet (30 dB), low speed (1900 RPM), move up to 67 CFM and take 7.5 watts of power each.
Here is a shot of the mounted fan. The trunk is big ugly at the moment but I plan to reinstall the carpeting after the modifications are complete.

Here is a shot from the bottom of the trunk. I've installed a vent which will deflect water spray while driving. They are angled to take the incoming air which should close the vents as well during speed.

I plan to ensure adequate ventilation this time and have installed two 120mm fans. They will connect directly to the 240v charger source and run continuously during the charge cycle. The fans are quiet (30 dB), low speed (1900 RPM), move up to 67 CFM and take 7.5 watts of power each.
Here is a shot of the mounted fan. The trunk is big ugly at the moment but I plan to reinstall the carpeting after the modifications are complete.

Here is a shot from the bottom of the trunk. I've installed a vent which will deflect water spray while driving. They are angled to take the incoming air which should close the vents as well during speed.

Thursday, September 2, 2010
Motor Cooling
One area I found that needed improvement was the motor cooling. There is an internal fan which does a decent job, but on longer commutes like mine the temperature of the motor just continues to rise. On really hot days I found the motor would cut out a little from time-to-time. My theory is this is the springs that hold the brushes down becoming too hot and allowing the brushes to float briefly.
My plan is to install four small fans directly above each set of brushes that turn on when the motor heats up using a thermostat. The thermostat is basically a temperature driven switch that will trigger a relay to turn on the fans. I selected 40C or 105F as the turn on. This will keep it from turning on during short trips but will ensure it starts cooling as soon as possible.
Here are the fans I used. They are 2" fans that do 20 CFM and draw .25 amps.

Here is one of the mounted fans and the thermostat. I made a bracket that attaches to the old temperature sensor and the thermostat bolts to the bracket.

When I manually enable the system I can feel a good breeze coming out the back the motor so that's a good sign. We'll see what happens after I get it back on the road.
My plan is to install four small fans directly above each set of brushes that turn on when the motor heats up using a thermostat. The thermostat is basically a temperature driven switch that will trigger a relay to turn on the fans. I selected 40C or 105F as the turn on. This will keep it from turning on during short trips but will ensure it starts cooling as soon as possible.
Here are the fans I used. They are 2" fans that do 20 CFM and draw .25 amps.

Here is one of the mounted fans and the thermostat. I made a bracket that attaches to the old temperature sensor and the thermostat bolts to the bracket.

When I manually enable the system I can feel a good breeze coming out the back the motor so that's a good sign. We'll see what happens after I get it back on the road.
Monday, August 30, 2010
More battery testing
I ordered 12 new cells for the upgrade. The plan was to replace the two cells that have had bad sag since day one and 10 new cells. I decided this would be a great time to do another capacity test for comparison against my original cells.
When I got the original cells I was told the factory capacity tests were all above 160, if I recall they were mostly around 165Ah. I charged a group of four new cells the same way I did the old cells. That is, not long after switching from CC stage into CV stage I remove charge and begin testing. The old cells were drained at ~130 amps until 2.5v and the worst cells yielded 145Ah, most around 150Ah. The new cells I only drained down to 2.8v and the reason is that at 2.8v they had produced 183.5Ah!
This raised a few thoughts of course and along with the fact they have improved the cells, I'm lead to believe that Sky Energy (CALB) who sells an equal size and weight 180Ah cell for more money is most likely selling the exact same battery. Unfortunately I don't have the 180Ah cells to test, perhaps they are getting 190-200Ah. I believe the batteries might be coming with more capacity also so that after time, they are still considered to be at their rated capacity or higher.
When I got the original cells I was told the factory capacity tests were all above 160, if I recall they were mostly around 165Ah. I charged a group of four new cells the same way I did the old cells. That is, not long after switching from CC stage into CV stage I remove charge and begin testing. The old cells were drained at ~130 amps until 2.5v and the worst cells yielded 145Ah, most around 150Ah. The new cells I only drained down to 2.8v and the reason is that at 2.8v they had produced 183.5Ah!
This raised a few thoughts of course and along with the fact they have improved the cells, I'm lead to believe that Sky Energy (CALB) who sells an equal size and weight 180Ah cell for more money is most likely selling the exact same battery. Unfortunately I don't have the 180Ah cells to test, perhaps they are getting 190-200Ah. I believe the batteries might be coming with more capacity also so that after time, they are still considered to be at their rated capacity or higher.
Trunk Mods Part II
Not much to show here. I've installed 15 additional cells in the area the old fuel tank use to be. This is directly above the rear sub frame. This is too much weight for the original shocks so I'll be modifying the suspension all around. Even though the sag isn't much, the suspension doesn't allow for much correction and the alignment was never back in spec causing inside tire wear. I plan to resolve that this time around.


Friday, August 27, 2010
Too Cool
After completing the trunk modifications I needed to modify the front racks to reduce the number cells and provide space for the air conditioning. Unfortunately during the first stages of the conversion I focused on getting batteries in and soon found I didn't have room for the AC. Wanting to make sure this didn't happen again, I decided to get the AC in and then see how many cells I could fit afterwards.
The first and probably hardest step determining how power the compressor. My first option was to modify the compressor to use a standard V belt. In this case it was easy to create a main pulley to attach to the motor. However I determined, after dismantling the compressor, it was going to be very difficult. My second option was to find/make a pulley that could use the same style of serpentine belt the compressor used. I opted for this method. I used the original pulley which accepted a spline shaft. The ADC 9" motor has a much smaller, round keyed shaft. I bought a 3/4" hub from tractor supply. I was able to get my uncle to turn down the hub and we then pressed it inside the original pulley with a hydraulic press. We ran a weld around one end to make sure it could turn inside. With this done it was just a matter of fabricating a frame that mounted the compressor and tensioner to the motor frame.
Here you can see completed setup. Reusing the tensioner instead of trying to make the compressor adjustable is the best route. The tensioner keeps the belt at the ideal tension as it stretches with age. This setup should be maintenance free for years.

Here is a shot from the other side.

I ordered from Jegs and got a Gates belt K060345. This is actually a bit over 35" and is the six v serpentine style belt used originally, just much shorter. This was stocked and I got a "free" hat. Considering their "free" shipping had a $5 handling fee, I'm not sure which one of the two I actually got free.
Here is a 12v functional test video. It's not nearly as noisy as this little camera picks up.
After everything was functional I needed to charge the AC system. The system had been opened for months, and even if it had only been opened for a day or so you need to do a lengthy evac process. An oil based vacuum pump is required which I bought one from Harbor Freight. You'll also need an AC manifold set which I also got from Harbor Freight.
The process is fairly simple. First connect the high(red) and low(blue) side hoses to the A/C system. The sizes are different so you can't accidentally connect the wrong one. This manifold set has a yellow hose and two spots where the yellow hose can connect, one is open and the other is a pressure fitting. Connect the yellow hose to the open side and then to the vacuum pump. Turn on the vacuum pump and then open the high and low valves. Let this run for several hours, the longer the better. The pump will get the system down fairly quickly, but it won't remove all the moisture this fast. You must leave it running to remove the moisture (3-5 hrs will do it). Once complete, first close the high and low valves, then turn off the vacuum pump.
You'll need to check the service manual to determine how much refrigerant should go into the system. You'll also need to replace any oil that was lost. There are refrigerants that contain oil, but it's not enough for a complete recharge so you'll need to do the math and figure out what you need.
The recharge process is simple. Read and follow the directions on the can first and foremost. Disconnect the vacuum pump and connect your refrigerant. The can should be shaken during the entire process. Open the valve on the can, then open the LOW side ONLY. Never open the high side valve while recharging. You'll hold the can upright and rotate 90 degrees every few seconds again given the can a good shake frequently. You'll want to make sure there is enough refrigerant and oil in the system before turning on the A/C system (again consult your service manual). Most systems should have a low pressure safety switch to prevent this. With the A/C system on max you'll notice the low side gauge drop as it compresses the gas to the high side. As it pulls from the low side more refrigerant from the can will pass into the system. As the can empties it slows down so be patient 5-15 minutes per can. Repeat this process to add oil and more refrigerant as needed. When complete close the low side valve, then close the refrigerant valve. The high and low side connectors can be popped off easily at this point, but when you disassemble the manifold some gases will escape so do this in a well ventilated area so you don't breath it in.
That was it, now I have some really cold air coming out of my EV!
The first and probably hardest step determining how power the compressor. My first option was to modify the compressor to use a standard V belt. In this case it was easy to create a main pulley to attach to the motor. However I determined, after dismantling the compressor, it was going to be very difficult. My second option was to find/make a pulley that could use the same style of serpentine belt the compressor used. I opted for this method. I used the original pulley which accepted a spline shaft. The ADC 9" motor has a much smaller, round keyed shaft. I bought a 3/4" hub from tractor supply. I was able to get my uncle to turn down the hub and we then pressed it inside the original pulley with a hydraulic press. We ran a weld around one end to make sure it could turn inside. With this done it was just a matter of fabricating a frame that mounted the compressor and tensioner to the motor frame.
Here you can see completed setup. Reusing the tensioner instead of trying to make the compressor adjustable is the best route. The tensioner keeps the belt at the ideal tension as it stretches with age. This setup should be maintenance free for years.

Here is a shot from the other side.

I ordered from Jegs and got a Gates belt K060345. This is actually a bit over 35" and is the six v serpentine style belt used originally, just much shorter. This was stocked and I got a "free" hat. Considering their "free" shipping had a $5 handling fee, I'm not sure which one of the two I actually got free.
Here is a 12v functional test video. It's not nearly as noisy as this little camera picks up.
After everything was functional I needed to charge the AC system. The system had been opened for months, and even if it had only been opened for a day or so you need to do a lengthy evac process. An oil based vacuum pump is required which I bought one from Harbor Freight. You'll also need an AC manifold set which I also got from Harbor Freight.
The process is fairly simple. First connect the high(red) and low(blue) side hoses to the A/C system. The sizes are different so you can't accidentally connect the wrong one. This manifold set has a yellow hose and two spots where the yellow hose can connect, one is open and the other is a pressure fitting. Connect the yellow hose to the open side and then to the vacuum pump. Turn on the vacuum pump and then open the high and low valves. Let this run for several hours, the longer the better. The pump will get the system down fairly quickly, but it won't remove all the moisture this fast. You must leave it running to remove the moisture (3-5 hrs will do it). Once complete, first close the high and low valves, then turn off the vacuum pump.
You'll need to check the service manual to determine how much refrigerant should go into the system. You'll also need to replace any oil that was lost. There are refrigerants that contain oil, but it's not enough for a complete recharge so you'll need to do the math and figure out what you need.
The recharge process is simple. Read and follow the directions on the can first and foremost. Disconnect the vacuum pump and connect your refrigerant. The can should be shaken during the entire process. Open the valve on the can, then open the LOW side ONLY. Never open the high side valve while recharging. You'll hold the can upright and rotate 90 degrees every few seconds again given the can a good shake frequently. You'll want to make sure there is enough refrigerant and oil in the system before turning on the A/C system (again consult your service manual). Most systems should have a low pressure safety switch to prevent this. With the A/C system on max you'll notice the low side gauge drop as it compresses the gas to the high side. As it pulls from the low side more refrigerant from the can will pass into the system. As the can empties it slows down so be patient 5-15 minutes per can. Repeat this process to add oil and more refrigerant as needed. When complete close the low side valve, then close the refrigerant valve. The high and low side connectors can be popped off easily at this point, but when you disassemble the manifold some gases will escape so do this in a well ventilated area so you don't breath it in.
That was it, now I have some really cold air coming out of my EV!
Thursday, August 19, 2010
Trunk Modifications Part I
I've been working on modifications to the car over the past couple weeks. In order to get the AC back into the car some of the cells needed be shifted from the front of the car to back. Additionally, I want to add a more cells. The only solution was to make better use of the trunk. The number of new cells I'll add is still not firm but I'm looking to add as many as possible for multiple reasons.
Here is a shot of the original trunk space. You can see there isn't much usable space currently above the fuel tank, about 3" and it opens up to only about 8-10" on the far right.

The old spot I use to have the charger has a curve to it and greatly reduces the usable space.


- Greater range. More cells means I have more energy and can travel further before recharging.
- Distributed load. The more cells I have, the less they have to work for my daily commute which will increase the life of the cells.
- Performance. Currently the 144v system allows the motor to hit about 4k RPM before the controller switches to VMax. Any additional increase in RPM greatly reduces torque requiring you to shift to a higher gear. Increasing the voltage will allow the torque to remain steady for higher RPM meaning the motor will want to rev out higher.
Here is a shot of the original trunk space. You can see there isn't much usable space currently above the fuel tank, about 3" and it opens up to only about 8-10" on the far right.

The old spot I use to have the charger has a curve to it and greatly reduces the usable space.

A couple of minutes with my plasma cutter and the rear most area is opened up and ready for a new battery rack.

This area now allows for storage of all 15 cells that used to take up the remaining trunk space (including charger). The rack is lined with a thin plastic and sealed to keep out water, etc. I used an expanding foam on the outside underneath the car to also fill in any open areas. The sides use a 1/4" thick steel for strength since the rack is also binding the cells together. If you use a thin metal it will bend as the cells begin to swell which is very bad on the cell life. It's amazing how much pressure is needed to contain them properly. The top (black) metal is much more light weight and designed to simply keep the cells from being able to shift upwards on bumpy roads or a rollover.

Next I will be working on the area where the gas tank use to sit. It looks like I can fit another 18 cells here if it all works out. I will need to make some suspension modifications for the extra weight I'm adding with these additional batteries.
Sunday, August 15, 2010
Battery testing
I have removed everything from the car to complete that to do list I created a long time ago and have been putting off (more on this later). While I had the batteries out I wanted to do a test to determine how much capacity is remaining now that the cells are about 1.5 years old and have over 15k miles. I've also calculated it takes me roughly 120Ah to get to work and 80Ah to return home (2k foot elevation climb to get to work). Using 15k miles, and the 70 mile commute that gives me about 214 trips I've made to work so far. Each round trip (120Ah + 80Ah) / 160Ah batteries = 1.25 charge cycles. Therefore, 214 x 1.25 is 267 charge cycles I've used.
Below is my battery testing solution.

My original testing plan was going to be to drain the batteries until the first cell reached low voltage, then rotate in another cell and continue testing to get results for each cell. After doing this only once I realized that the capacity of the cells was extremely close and it wasn't worth the extra time. I won't post all the results but basically my lowest cell produced 145Ah. I had other groups producing 148, 150, etc. They were all extremely close. Even the two cells that have terrible voltage sag still produced over 145Ah like the others. Now 145Ah is just over 90% of original capacity, however, remember my charging method was manual and I didn't give it the time to do much constant voltage charging. So to my surprise, I think I'm still near original capacity. The only thing is I didn't do this testing when the cells were new and I'm told they will have at least 160 but usually more, so it's possible I've lost more than I know. Either way this is good news and I'm quite happy with the results.
Below is my battery testing solution.
- Costco a 2300 watt power inverter. This allows me to test four batteries at a time to get my 12v source.
- 1500 watt space heater. This gives me just over 130 amp load on the batteries which is close to 1C and will give a decent enough load to test.
- E-Xpert pro battery monitor from TBS Electronics with a 500 amp shunt. This will track the Ah used for me and give accurate results compared to trying to calculate this myself based off of ever changing voltage/amperage as the batteries drain.
- CellLog8 allowed me to easily monitor each cells voltage to determine when a cell was too low during the load test or too high during recharge.
- For charging I used my original battery charger, a 12v charger I had, and my bench power supply. This allowed me to charge up to 45 amps and helped speed up the testing greatly. I only did quick charges and once the amperage needed was between 5-10 amps I stopped charging and begin the test. This means the cells were NOT fully charged (probably 90 - 95% is my guesstimate) which is important when reviewing the results below.

My original testing plan was going to be to drain the batteries until the first cell reached low voltage, then rotate in another cell and continue testing to get results for each cell. After doing this only once I realized that the capacity of the cells was extremely close and it wasn't worth the extra time. I won't post all the results but basically my lowest cell produced 145Ah. I had other groups producing 148, 150, etc. They were all extremely close. Even the two cells that have terrible voltage sag still produced over 145Ah like the others. Now 145Ah is just over 90% of original capacity, however, remember my charging method was manual and I didn't give it the time to do much constant voltage charging. So to my surprise, I think I'm still near original capacity. The only thing is I didn't do this testing when the cells were new and I'm told they will have at least 160 but usually more, so it's possible I've lost more than I know. Either way this is good news and I'm quite happy with the results.
Monday, June 28, 2010
In the name of science part II
If you recall from the last testing I put two Kelley controllers up against my Curtis 1231C. We did some repeated 0-30mph tests and compared times while monitoring the motor side amp output. The Curtis accelerated my car in second gear to 30mph in 7-8 seconds (nothing official just eye-balling a standard watch).
I've been in touch with a great guy who works at Curtis. This weekend I had the opportunity to test a modified Curtis 1231C. Unfortunately I only had a 500 amp shunt so we weren't able to test the motor side amps. I did see my battery amps peaking somewhere around 650-700 though as the controller reached Vmax. This controller reduced my 0-30 to 5 seconds. I will add the shunt later and get the real output from it soon.
He also has an even higher end modified 1231C, but we were having some issues with it. It should be 200 amps more or so. It would be nice to see a 3 second 0-30 :)
Unfortunately I can't give out any of the secret sauce that is being used to upgrade/modify these controllers since I didn't obtain the information myself and don't want to get anybody in trouble.
We should be doing some more tests with the 2nd upgraded controller later and I'll be sure to have the shunt ready for some numbers. I realize most people won't be able to make these modifications, but it should give you a good idea of expected acceleration for a given amount of continuous amps.
I've been in touch with a great guy who works at Curtis. This weekend I had the opportunity to test a modified Curtis 1231C. Unfortunately I only had a 500 amp shunt so we weren't able to test the motor side amps. I did see my battery amps peaking somewhere around 650-700 though as the controller reached Vmax. This controller reduced my 0-30 to 5 seconds. I will add the shunt later and get the real output from it soon.
He also has an even higher end modified 1231C, but we were having some issues with it. It should be 200 amps more or so. It would be nice to see a 3 second 0-30 :)
Unfortunately I can't give out any of the secret sauce that is being used to upgrade/modify these controllers since I didn't obtain the information myself and don't want to get anybody in trouble.
We should be doing some more tests with the 2nd upgraded controller later and I'll be sure to have the shunt ready for some numbers. I realize most people won't be able to make these modifications, but it should give you a good idea of expected acceleration for a given amount of continuous amps.
Tuesday, June 22, 2010
15/100
Things are still looking good on the daily commute. The car itself broke 100k miles a couple weeks ago and I'm now at 15k EV miles!
The increase in temperature has made a little improvement to the increasing voltage sag. I think the bottom line is I'm pushing these cells harder than I should for longevity. I believe my commute to work is using >80% capacity and this is taking a toll on capacity. Some mornings I have cell that is very close to fully discharged. I don't know how many miles I have left before at least one cell can't make it and possibly gets ruined to get me here.
I keep going in circles, but I'm leaning towards not selling it now. I'm thinking of making some modifications though now that I see how reliable the conversion itself is. Nothing official yet but here are some ideas I'm toying around with.
Motor controller: The Curtis 1231C has been reliable but I want to get the acceleration back in this car. I'm leaning towards the Soliton1 again for a few reasons.
The increase in temperature has made a little improvement to the increasing voltage sag. I think the bottom line is I'm pushing these cells harder than I should for longevity. I believe my commute to work is using >80% capacity and this is taking a toll on capacity. Some mornings I have cell that is very close to fully discharged. I don't know how many miles I have left before at least one cell can't make it and possibly gets ruined to get me here.
I keep going in circles, but I'm leaning towards not selling it now. I'm thinking of making some modifications though now that I see how reliable the conversion itself is. Nothing official yet but here are some ideas I'm toying around with.
Motor controller: The Curtis 1231C has been reliable but I want to get the acceleration back in this car. I'm leaning towards the Soliton1 again for a few reasons.
- It will increase my motor side amps from 500 to 1000.
- It's much larger and has great cooling with the option of water cooling if needed. In the hot summer days on my long commute doing 70mph the Curtis is kicking down the amps sometimes.
- It has many features that will make protecting the batteries, and motor a breeze. I'd like to add some features, but reduce complexity of the build and I think this will be a good step in that direction.
- I'll have the ability to run a pack voltage that is much higher than the voltage applied to the motor. This allows you to run more smaller batteries allowing you to still get the capacity you want, but make it easier to fit them. It also will remove volt sag during hard acceleration. The pack itself will sag, but if your pack voltage is high enough the motor will receive a steady voltage increasing performance even on those cold days.
Trunk mod:
I think I'll end up cutting out the current trunk and expanding it. There is a LOT of room that is not being utilized under there. This will allow me to add more batteries and even move some of the front batteries to the back giving me room to finally mount that AC that I've been missing.
Batteries:
Currently I'll just add some more cells (I'd like to add another 15 or so) so I can get as much from the existing cells. This should ease up on them and extend there life some on my commute. This will give me not only more capacity but the ability to crank up the motor voltage a bit also to increase high end performance along side of the low end performance I'll gain from the controller change.
BMS:
I'd like to get the car to a point where I don't have to look at anything and worry about what's going on. I want to simplify this side of things most of all. I want to be able to get in the car, look at my "fuel" gauge and know if I'm good to go. If there are any issues, then be able to connect something and diagnose the problem. I'm looking into some options for a low cost over haul here. The biggest problem with adding more and more cells is the complexity of protecting them.
As always, anything I do I'll document and share with you.
Subscribe to:
Posts (Atom)


